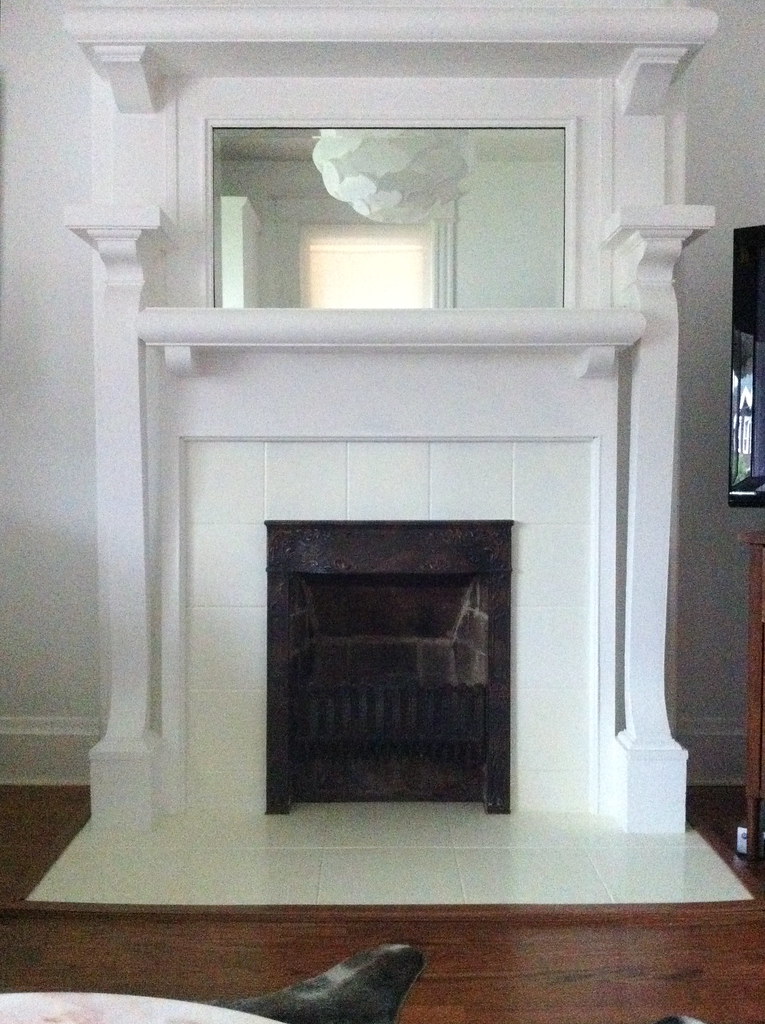
When I first laid eyes on my century-old home, the dark brick fireplace dominated the living room like an imposing monument. Years of soot and neglect had turned what was once a beautiful focal point into something that felt heavy and outdated. I knew immediately that this space needed transformation. The vision came to me clearly: a crisp white fireplace surrounded by elegant tile that would breathe new life into our family gathering space. This renovation would become one of my most rewarding home improvement projects, teaching me valuable lessons about design, patience, and the power of bold choices.
Planning this transformation required careful consideration of materials, techniques, and timing. I spent countless hours researching different types of paint suitable for high-heat applications, studying various tile options that would complement a white finish, and measuring every dimension multiple times. The key was selecting products that could withstand the extreme temperature changes while maintaining their pristine appearance. I discovered that specialized fireplace paint and heat-resistant primers would be essential. My research led me to understand that proper preparation would make or break this entire project, setting the foundation for years of beautiful results.

The preparation phase proved more intensive than I initially expected, requiring meticulous attention to every surface detail. I began by thoroughly cleaning the existing brick with a wire brush and TSP cleaner, removing decades of accumulated grime and residue. Each brick needed individual attention, ensuring that paint would adhere properly without peeling or bubbling under heat exposure. I carefully taped off the surrounding walls and covered the floors with plastic sheeting. The firebox required special preparation, including filling any cracks with high-temperature caulk and sanding rough areas. This groundwork took three full weekends but proved crucial for achieving professional-looking results.
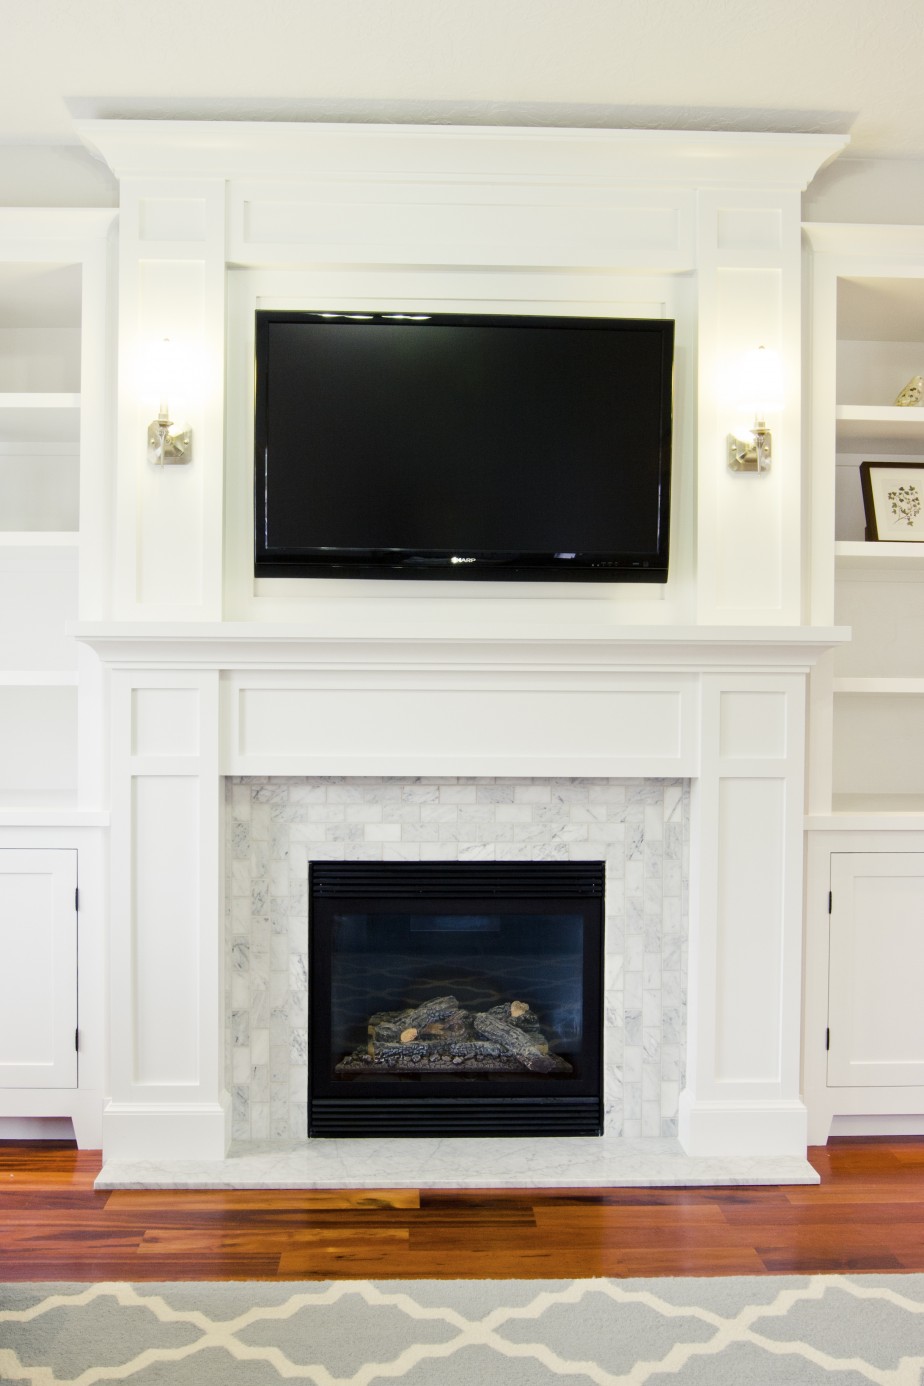
Selecting the perfect tile became an adventure in balancing aesthetics with practicality, leading me through countless showrooms and design centers. I initially gravitated toward classic subway tiles, but ultimately chose large-format porcelain tiles with subtle veining that would create visual interest without overwhelming the clean white fireplace. The neutral gray veining would provide just enough contrast to prevent the entire surround from appearing too stark. I calculated that twelve-inch square tiles would require fewer grout lines, creating a more streamlined appearance. The tile needed to be rated for fireplace applications, ensuring it could handle the heat without cracking or discoloring over time.

The painting process required multiple thin coats applied with careful technique, transforming the dark brick into a luminous white surface gradually. I used a high-quality angled brush for the mortar joints and a small roller for the brick faces, ensuring complete coverage without leaving brush marks. Each coat needed to dry completely before applying the next layer, requiring patience as the transformation slowly emerged. The first coat looked patchy and concerning, but by the third coat, the beautiful white finish began to shine through. I applied a final protective coat of heat-resistant sealer, knowing this would help maintain the pristine appearance through years of use and seasonal temperature changes.
Installing the tile surround challenged my DIY skills but rewarded me with a stunning custom look that exceeded my expectations completely. I started by marking precise guidelines on the wall, ensuring the tile layout would be perfectly centered and symmetrical. Using a high-quality tile adhesive specifically designed for fireplace applications, I worked methodically from the center outward. Each tile required careful placement and leveling, checking alignment constantly with my laser level. The corners presented the biggest challenge, requiring precise cuts with a wet saw. Spacers helped maintain consistent gaps for grouting, while frequent cleaning prevented adhesive from hardening on the tile surfaces during installation.

Grouting required steady hands and quick work, as the material sets rapidly and mistakes become permanent features of the finished surface. I mixed small batches to avoid waste and worked in sections, spreading the grout diagonally across the tiles to fill all joints completely. The cleanup process proved critical, requiring multiple passes with a damp sponge to remove all residue without disturbing the fresh grout lines. I waited the recommended curing time before applying grout sealer, protecting these vulnerable areas from stains and moisture. The final buffing revealed the beautiful contrast between the white tiles and their perfectly uniform gray grout lines, creating the clean geometric pattern I had envisioned.
The finished fireplace exceeded every expectation, creating a bright focal point that completely transformed our living space and daily routines. The white paint reflected light throughout the room, making the entire area feel larger and more inviting than before. Friends and family immediately noticed the dramatic change, commenting on how modern and fresh the space appeared. The tile surround added sophisticated texture and visual interest without competing with the clean simplicity of the white brick. Evening fires now cast beautiful dancing shadows across the smooth tile surface, creating an ambiance that feels both cozy and elegant, exactly what I hoped to achieve.
Maintaining this beautiful fireplace requires regular attention but proves surprisingly manageable with the right approach and quality materials. I vacuum the tile surfaces monthly and wipe them down with a damp microfiber cloth to remove any dust or residue. The white paint shows soot more readily than the original dark brick, so I clean the firebox thoroughly after each burning season. Touch-up paint keeps the finish looking fresh, addressing any minor scuffs or chips that occur from normal fireplace tools usage. The tile requires periodic resealing of grout lines, but this simple maintenance task ensures the surround continues looking perfect year after year, protecting our investment.
This renovation taught me valuable lessons about patience, planning, and trusting the process even when initial results looked concerning initially. The transformation from dark, outdated brick to bright, contemporary elegance demonstrates how dramatic home improvements can be achieved through careful material selection and methodical execution. I gained confidence in my DIY abilities while creating a space that brings joy every single day. The white fireplace with tile surround has become the heart of our home, where we gather for cozy evenings and create lasting memories. This project proves that with proper preparation and quality materials, homeowners can achieve professional-looking results that enhance both property value and daily living enjoyment.

What type of paint should I use for painting a brick fireplace white?
I strongly recommend using paint specifically formulated for high-heat applications, such as Rust-Oleum Universal Specialty High Heat Paint or similar products rated for temperatures up to 1200 degrees Fahrenheit. Regular wall paint will bubble, peel, and discolor when exposed to fireplace heat. Start with a high-quality primer designed for masonry surfaces to ensure proper adhesion. Apply multiple thin coats rather than one thick coat for best results. The investment in specialized paint pays off with durability and appearance that lasts for years. Always allow complete drying time between coats and ensure proper ventilation during application.
How do I choose the right tile for a fireplace surround?
Select tiles specifically rated for fireplace applications that can withstand rapid temperature changes without cracking or discoloring over time. Porcelain and natural stone tiles generally perform well in these conditions. Consider the size and pattern carefully; larger tiles create fewer grout lines for easier maintenance, while smaller tiles offer more design flexibility. The tile should complement your overall design scheme without overwhelming the space. Neutral colors provide timeless appeal and pair beautifully with white painted brick. Always verify that both the tile and adhesive are rated for high-heat applications before beginning installation.

Can I install fireplace tile myself, or should I hire professionals?
DIY installation is possible with proper preparation, quality tools, and patience, though it requires careful attention to detail throughout the process. Start by measuring precisely and planning your layout on paper before beginning. Invest in a quality wet tile saw for clean cuts, especially around corners and edges. Take time to research proper techniques for mixing adhesive, setting tiles, and grouting joints. The key is working methodically and maintaining consistent spacing and alignment. However, if you feel uncomfortable with any aspect of the project or lack experience with tile work, consulting a professional ensures optimal results and prevents costly mistakes.
How long does this type of fireplace renovation typically take to complete?
Plan for approximately two to three weeks from start to finish, accounting for proper drying and curing times between each phase of work. Preparation and cleaning take about two days, followed by primer and multiple paint coats, requiring several more days with drying time between applications. Tile installation typically requires one to two days, depending on the size of the surround, followed by at least 24 hours before grouting can begin. Grouting and cleanup take another day, then the grout needs several days to fully cure before sealing. Weather conditions and humidity levels can extend these timeframes, so avoid rushing the process for the best results.

What maintenance is required to keep a white painted fireplace looking good?
Regular maintenance keeps your white fireplace looking pristine and extends the life of both paint and tile surfaces significantly over time. Clean tile monthly with a microfiber cloth and mild cleaner, paying attention to grout lines where dirt accumulates most readily. Touch up paint chips or scuffs immediately to prevent them from becoming larger problems. Deep clean the firebox at the end of each burning season, removing all ash and debris that could stain surrounding surfaces. Reseal grout lines annually to prevent staining and moisture penetration. With consistent care, your beautiful white fireplace will maintain its fresh appearance for many years of enjoyment.
Will painting my brick fireplace white decrease my home’s resale value?
A well-executed white painted fireplace typically enhances rather than diminishes property value by creating a bright, updated focal point in your living space. Modern buyers generally prefer clean, contemporary looks over dark, dated brick finishes that can make rooms feel smaller and older. The key is using proper materials and techniques to ensure a professional appearance that will last. Quality workmanship with appropriate high-heat paint and complementary tile surround demonstrates attention to detail that buyers appreciate. However, always consider your local market preferences and overall home style when making design decisions that could impact future resale potential and buyer appeal.

vertical shiplap fireplace White brick fireplace, Fireplace remodel, White

My marble tile fireplace

Painted Fireplace Tile
Related Posts: