I stumbled into the retro tile obsession quite by accident. While renovating my 1960s ranch house two years ago, I discovered original aqua and gold tiles hidden behind decades of paint on our fireplace surround. The moment I carefully scraped away that last layer of beige paint and saw those gorgeous geometric patterns emerge, I was hooked. What started as a simple fireplace update became a full-blown passion for hunting down, restoring, and incorporating retro tiles into my home. I’ve since completed three fireplace projects and helped friends with their own, learning something new with each installation.
The golden age of fireplace tiles really spanned the 1950s through the 1970s, and each decade had its own distinctive style. The fifties brought us atomic age patterns and soft pastels, the sixties introduced bold geometric designs and avocado greens, while the seventies gave us earthy harvest golds and burnt oranges. I’ve worked with tiles from all these eras, and each has its own charm. My favorite find was a set of chocolate brown tiles with an embossed sunburst pattern from 1972 that I discovered at an estate sale. They were still in their original boxes, never installed, perfect condition.
Sourcing authentic retro tiles requires patience and persistence. I’ve had my best luck at architectural salvage yards, estate sales, and online marketplaces. Sometimes you’ll find complete sets, but more often you’re piecing together enough tiles from different sources to complete your project. I always buy extra tiles because matching them later is nearly impossible. Reproduction retro tiles have improved dramatically in recent years, and I’ve used them when originals weren’t available. The key is mixing them thoughtfully with genuine vintage pieces so the overall effect feels authentic rather than like a theme park version of the past.
My first retro tile installation taught me humility. I watched several YouTube tutorials and thought I could handle it myself. The result was, well, let’s just say I had to call in a professional to fix my mistakes. Tile work requires precision, especially around a fireplace where heat expansion matters. The spacing needs to be consistent, the adhesive must be appropriate for high-heat areas, and the grouting requires skill to look clean. Now I always hire an experienced tile setter for the actual installation, though I do the design work and tile hunting myself. It’s worth paying for expertise to ensure your beautiful vintage tiles look their best.
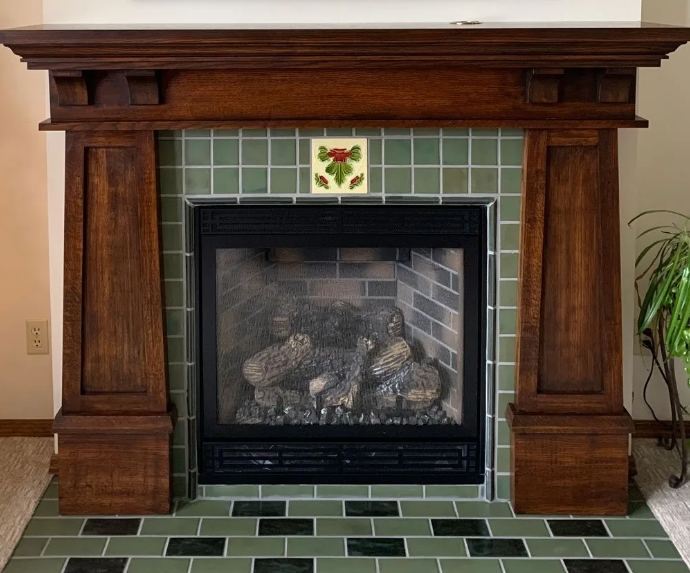
Color coordination with retro tiles is both challenging and fun. Those old-school colors like avocado, harvest gold, and burnt orange can be tricky to incorporate into modern spaces. I’ve learned to treat the fireplace as an accent feature and pull complementary colors for the room rather than trying to match exactly. My living room has a fireplace with sage green retro tiles, and I’ve paired it with cream walls, natural wood furniture, and touches of terracotta. The key is balancing the boldness of retro colors with more neutral surrounding elements so the space feels curated rather than dated.
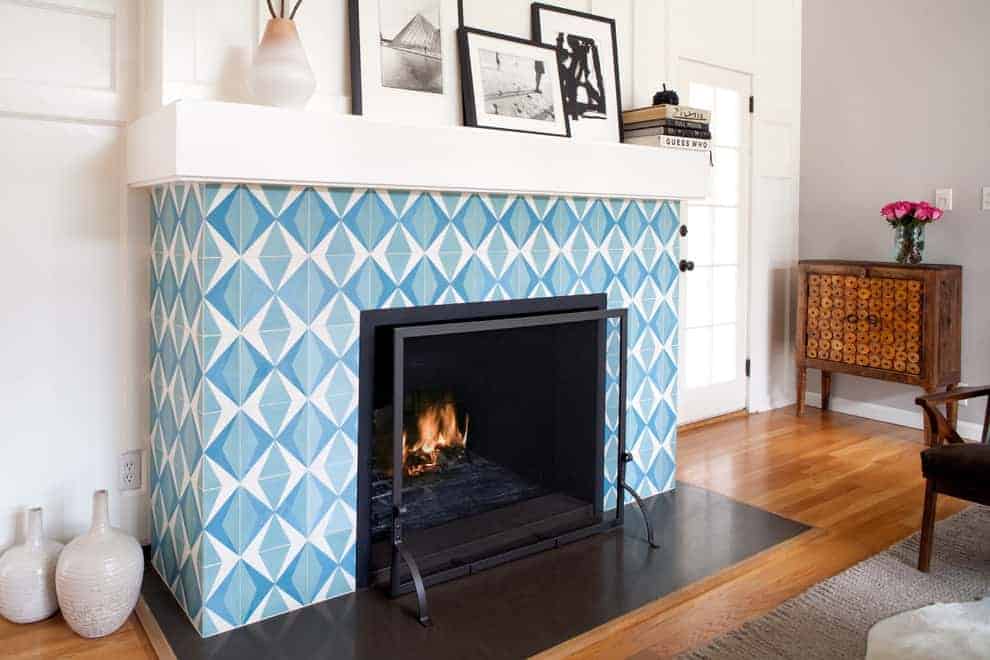
Pattern mixing is where retro tiles really shine. Many vintage fireplace designs combined multiple tile patterns in creative ways, something you rarely see in contemporary design. I’ve mixed solid color tiles with patterned ones, used borders to frame the firebox, and created asymmetrical designs that feel playful yet intentional. One of my projects featured a checkerboard pattern in mustard yellow and cream with a row of embossed tiles creating a border. Don’t be afraid to experiment with layouts before committing. I always do a dry layout on the floor first to visualize how patterns work together.
Maintenance of retro tiles has been surprisingly straightforward. Most vintage tiles are glazed ceramic, which makes them durable and easy to clean. I wipe them down monthly with a damp cloth and mild soap, avoiding harsh chemicals that could damage older glazes. Some of my salvaged tiles had staining that required more intensive cleaning with a paste of baking soda and water. The grout is actually more vulnerable than the tiles themselves. I reseal grout lines annually to prevent staining and keep everything looking fresh. Heat from the fireplace hasn’t damaged any of my tile installations when properly installed with appropriate materials.
The emotional connection I’ve developed with these tiles surprises me. Each one represents a moment in design history, a color palette that defined an era, and craftsmanship that’s increasingly rare. When I light my fire and see those retro tiles glowing in the firelight, I feel connected to the homeowners of decades past who also gathered around their hearths. There’s something deeply satisfying about preserving these design elements and giving them new life. My kids think I’m a bit crazy with my tile obsession, but even they admit our retro fireplaces are pretty cool.

The investment in retro tile fireplaces varies wildly depending on whether you’re using salvaged originals or reproductions. I’ve spent as little as fifty dollars on salvaged tiles for a small project and as much as eight hundred for a complete fireplace surround with rare patterns. Installation costs typically run five hundred to fifteen hundred dollars depending on complexity. While it’s not the cheapest option, the uniqueness and character these tiles bring make them worthwhile. You’re creating something that can’t be replicated with mass-produced contemporary materials, and that has value beyond dollars and cents.
Looking back on my retro tile journey, I appreciate how much these projects have taught me about design, patience, and the importance of preserving architectural history. Every fireplace I’ve tiled tells a story, not just of its era but of my own growth as a homeowner willing to take creative risks. If you’re considering a retro tile fireplace, I encourage you to embrace the process. Hunt for those perfect tiles, work with skilled craftspeople, and don’t be afraid of bold colors and patterns. The result will be a focal point that’s truly one of a kind, a conversation starter that brings warmth and personality to your home in ways modern materials simply can’t match.

Where can I find authentic retro fireplace tiles?
I’ve had the most success at architectural salvage yards, which often have bins of loose tiles salvaged from demolished homes. Estate sales are goldmines, especially if the house is from the right era. Online marketplaces like eBay and Facebook Marketplace occasionally have listings. Antique stores sometimes carry them, but usually at premium prices. I also check with demolition contractors who might set aside tiles before houses are torn down. Building relationships with salvage dealers helps because they’ll call when they get tiles in. Patience is essential since finding enough matching tiles can take months.
Are reproduction retro tiles as good as originals?
Quality reproduction tiles have improved dramatically. Some manufacturers now make excellent reproductions of classic patterns that are virtually indistinguishable from originals. The advantage is consistency; you get exactly the quantity you need in perfect condition. However, authentic vintage tiles have subtle variations in glaze and color that give them character that reproductions can’t fully replicate. I often mix both, using reproductions for the main field and reserving precious original tiles for feature areas. For most people, high-quality reproductions are a practical choice that still achieves the retro aesthetic without the hunting hassle.

Can retro tiles withstand fireplace heat?
Yes, when properly installed. Vintage fireplace tiles were specifically manufactured to handle heat, just like their modern counterparts. The key is using an appropriate heat-resistant adhesive and leaving proper expansion gaps. I’ve had retro tiles around active fireplaces for years without any cracking or damage from heat. Make sure your installer uses thin-set mortar rated for heat exposure and doesn’t apply tiles directly to surfaces that get extremely hot. The tiles themselves are durable; it’s the installation method that matters. Any experienced tile setter should know the proper techniques for fireplace applications.
How do I incorporate bold retro colors into a modern home?
I treat retro-tiled fireplaces as accent features rather than trying to make the whole room match. Use neutral wall colors like white, cream, or gray to let the tiles shine. Pull one or two accent colors from the tiles for throw pillows or artwork rather than matching everything exactly. Natural materials like wood and leather pair beautifully with retro tiles. Modern furniture can actually highlight vintage tiles through contrast. The key is confidence, own the bold colors as an intentional design choice rather than apologizing for them. When done right, retro tiles add character and warmth to contemporary spaces.

What if I can’t find enough matching tiles for my project?
This is a common challenge with salvaged tiles. I approach it creatively by designing patterns that incorporate multiple tile types intentionally. Use different colors or patterns in borders, create a patchwork effect, or design an asymmetrical layout that looks planned. Sometimes mixing eras and patterns creates the most interesting results. Calculate your square footage carefully and buy every matching tile you can find, even extras. You can also use reproduction tiles as field tiles and reserve rare originals for focal points. Embrace imperfection, it’s part of the charm of working with vintage materials.
Is DIY installation of retro tiles feasible for beginners?
I learned the hard way that tile installation is trickier than it looks, especially around fireplaces. Heat considerations, proper adhesive selection, consistent spacing, and clean grouting all require skill. If you’re determined to DIY, start with a small, low-stakes project first. Watch multiple tutorials, invest in proper tools, and take your time. For fireplace surrounds, I honestly recommend hiring a professional. The cost difference between DIY and professional installation is usually a few hundred dollars, and the results are worth it. You can save money by doing the design work and tile sourcing yourself while leaving the technical installation to experts.

1930s fireplace tile

Related Posts: