The large stone fireplace chimney in my century-old farmhouse struck me as the most intimidating element, dominating the living room with its rough-hewn granite face and aged mortar. When we bought the house five years ago, I had conflicting feelings about this architectural feature; I admired its artistry but questioned its practicality. The previous owners had shut it off due to efficiency concerns, yet something about those stones appealed to me. I found myself running my fingertips across their cool, uneven surfaces, feeling the faint chisel traces left by anonymous hands from years ago. My restoration quest began with a basic curiosity, which grew into an appreciation for traditional building processes.
My knowledge in stone chimney construction began with many hours spent researching old building techniques. I learned that my chimney was a conventional “stack” style, with many fireplaces on different floors connecting to a single large chimney structure. The stones were not placed at random, but rather in a purposeful arrangement, with larger foundation stones progressively shifting to smaller stones at the top to minimize weight. The most fascinating aspect was learning about the original lime mortar, which allowed the structure to flex slightly throughout seasonal temperature variations without splitting. This adaptability explained why it had endured more than a hundred winters, whereas modern concrete-based chimneys frequently failed within decades.
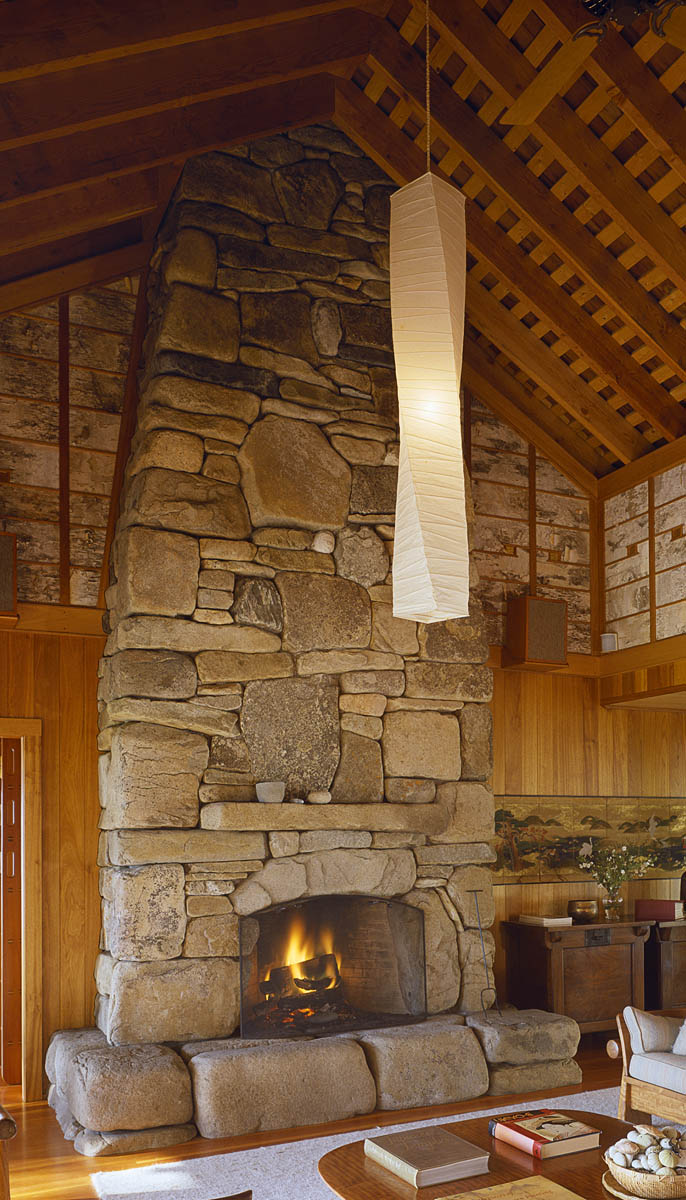
Finding experienced contractors to evaluate and restore the chimney proved to be an unexpected challenge. Modern masons frequently specialize in brick or concrete block construction, with few educated in traditional stone techniques. After several calls and referrals, I met Martin, a third-generation stonemason who specialized in historical restorations. His initial evaluation confirmed what I suspected: the chimney was structurally fine but required major upkeep. The mortar had eroded in several places, particularly at the rooftop, where water exposure was highest. Some stones had displaced slightly, potentially causing smoke leakage and limiting draft effectiveness, both of which needed to be addressed before safe usage.
The renovation began with a thorough cleaning of the complete chimney system. Martin’s crew meticulously removed decades of creosote accumulation from the internal flue, revealing the original clay liner, which was mainly intact, demonstrating its quality. On the outside, mild pressure washing removed surface dust and biological development without harming the stones. This cleaning procedure revealed previously unknown concerns, such as some stones that had fractured owing to earlier freeze-thaw cycles. I was captivated by how the chimney told its own tale through these faults, with each crack and stain marking a chapter in the home’s history, which made me even more determined to preserve its integrity during repair.
Repointing the mortar joints was the most labor-intensive part of the renovation. Martin created a unique lime-based mortar that matched the ancient composition, stating that current cement-based mortars will eventually harm the stone by impeding vital moisture circulation. I observed as he painstakingly chiseled out deteriorating mortar, never removing more than was necessary to preserve structural integrity. The fresh mortar was firmly pressed into the joints using traditional methods, and Martin occasionally adjusted the color by adding natural pigments to match nearby portions. This laborious operation took nearly two weeks for a single chimney face, but the results were worth every minute spent.
Addressing the chimney’s crown, or flat area at the very top, found indications of previous poor repairs. Someone had poured a layer of concrete directly over the original stone, forming an impervious barrier that held moisture below and hastened deterioration. Removing this foolish “improvement” needed careful hammer work to prevent injuring the stones beneath. Martin created a correct crown with a little slope to efficiently shed water while remaining historically accurate. We installed copper flashing at important junctions where the chimney breached the roof, forming suitable water barriers to preserve both the chimney and the roof structure for decades.

The internal firebox renovation yielded amazing insights into past heating techniques. Behind a sealed panel built in the 1950s, we discovered the original fireplace dimensions, which were substantially larger than modern counterparts. Martin said that the huge openings caused strong drafts, which fed oxygen-hungry fires in dwellings lacking contemporary insulation. We also discovered remnants of a swing-arm crane mechanism that originally held cooking pots over the fire, indicating the fireplace’s original dual purpose of heating and cooking. I chose to repair these historical aspects rather than entirely modernize them, implementing appropriate damper systems and a detachable glass screen that maintained efficiency while retaining charm.
Installing a stainless steel liner within the old clay flue represented our most significant concession to new safety norms. This flexible tube, carefully threaded down from the rooftop, provided a smooth, continuous passage for smoke and gases to exit while controlling any heat that would otherwise travel to combustible elements within walls. Insulating material was used to fill the area between the new liner and the existing clay flue, significantly increasing efficiency. This modern adaption is completely inconspicuous from both inside and outside the home, retaining historical authenticity while assuring family safety, a compromise that met both my restoration goals and practical fire protection concerns.

The final procedure required carefully selecting suitable stones to replace the few that had eroded beyond repair. Martin discovered a small quarry that is still in operation in our area and uses conventional extraction methods to provide replacement stones with mineralogical qualities that match ours. Each replacement stone was hand-finished to match the surface roughness of surrounding pieces, and Martin taught me how to utilize conventional techniques to produce accurate results. I spent several weekends working with him, learning the peaceful rhythm of hitting stone and experiencing a deep connection to the original builders as my muscles established the same memory patterns as theirs, crossing generations via shared physical experience.
Lighting the first fire in our repaired stone chimney was a tremendously joyful occasion that went beyond simple home improvement. As fires flashed against the repaired stones, shadows danced across surfaces touched by numerous hands over years, I felt a deep feeling of connection. The warmth emanating from those stones symbolized more than simply thermal energy; it embodied ancient craftspeople’s accumulated expertise, the importance of gradual restoration over hasty replacement, and the quiet dignity of practical beauty that improves with age. My stone chimney today serves as the real and figurative heart of our home, linking us to its past while warming its future, demonstrating the enduring significance of historic elements that have been meticulously maintained.

How can I know whether my stone chimney need professional attention?
Look for mortar that crumbles easily when scraped with a key, vertical fissures that run through several joints, stones that appear loose or moved, white mineral deposits (efflorescence) that indicate water penetration, and broken flashing where the chimney meets the roof. Inside, check for falling debris in the firebox, smokey aromas when not in use, and dampness around the chimney after a rainstorm. An annual inspection by a Chimney Safety Institute of America-certified chimney sweep delivers the most trustworthy assessment, with a focus on the crown and flashing, where most problems begin.
What is the distinction between modern cement mortar and traditional lime mortar for stone chimneys?
Traditional lime mortar consists of lime, sand, and water, resulting in a relatively flexible substance that allows for slight movement without shattering and allows moisture to evaporate freely from the masonry. Modern Portland cement mortar sets harder and faster, but it forms a tight bond that might shatter with seasonal movement and traps moisture within the stones, potentially causing freezing damage. While cement mortars provide more immediate strength, they generally shorten the longevity of historic stone structures. My renovation included a modified lime mortar to ensure historical correctness and long-term performance.

How much does a full stone chimney restoration generally cost?
My whole restoration, which included repointing, crown rebuilding, flashing replacement, firebox restoration, and liner installation, cost around $14,000. Simpler repointing tasks may cost between $3,000 and $5,000, however structural difficulties with misplaced stones can cost more than $20,000. Geographic location has a substantial impact on pricing, with talented traditional masons asking higher rates in locations where their knowledge is scarce. Materials account for around 15% of total cost, with specialist personnel accounting for the vast majority of the expense.
Can I undertake any maintenance on my stone chimney on my own, or does it all need to be done professionally?
Regular inspection and recording are do-it-yourself tasks; photographing your chimney once a year allows you to follow small changes over time. Accessible stonework can be gently cleaned with soft brushes and mild detergent to prevent biological growth. Simple waterproofing techniques, such as inspecting and caulking flashing, are doable for relatively skilled homeowners. Repointing, structural repairs, and anything that requires ladder work above one level should be left to the professionals. My own involvement was limited to aiding my mason under supervision, learning ancient skills while maintaining safety.

How energy efficient is a repaired stone fireplace compared to modern heating systems?
Traditional open stone fireplaces are approximately 10-15% efficient, which means that the majority of the heat escapes up the chimney. My restoration improved this slightly with a correctly installed damper, appropriate glass doors, and a stainless steel liner with insulation, perhaps reaching 20-25% efficiency. This remains far lower than modern wood stoves (70-80%) or gas heating (85-97%). However, the fireplace is currently used mostly for supplemental zone heating and aesthetic enjoyment rather than as our primary heat source, with the efficiency trade-off offset by the historical preservation and emotional value it brings.
How long should a well restored stone chimney survive before requiring extensive maintenance?
With proper maintenance, my repaired stone chimney should be structurally sound for at least 50 years before requiring another thorough restoration. Mortar joints generally require maintenance every 25-30 years, however the stainless steel liner has a lifetime warranty. In our environment, copper flashing should survive for more than 70 years. Regular cleaning minimizes creosote buildup, which can damage the interior. This longevity is dependent on constant maintenance, which includes annual professional inspections, timely resolution of minor concerns, and protection of the crown against water penetration, which is the primary determinant influencing how frequently significant restoration is required.
Fireplaces, Masonry Stoves, and Chimneys: Questions related to the book Living Homes

Fireplace and Chimney – Freshwater Stone

Quality Stone and Brick Chimneys and Fireplaces MW Masonry, Inc

Chimney Chimney design, Exterior fireplace, Brick chimney

Related Posts: