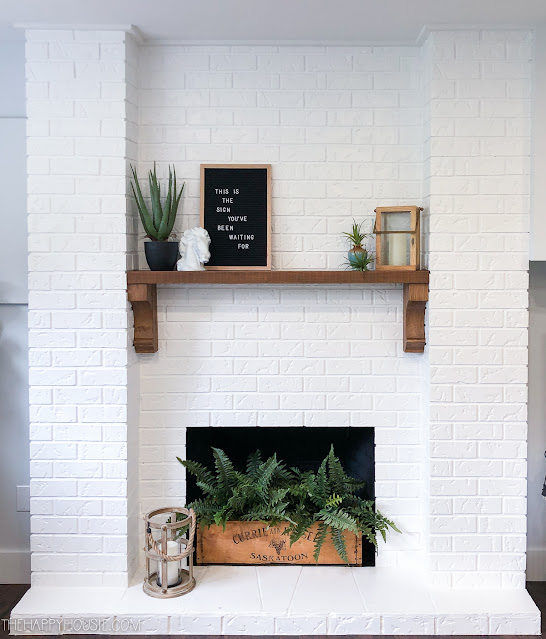
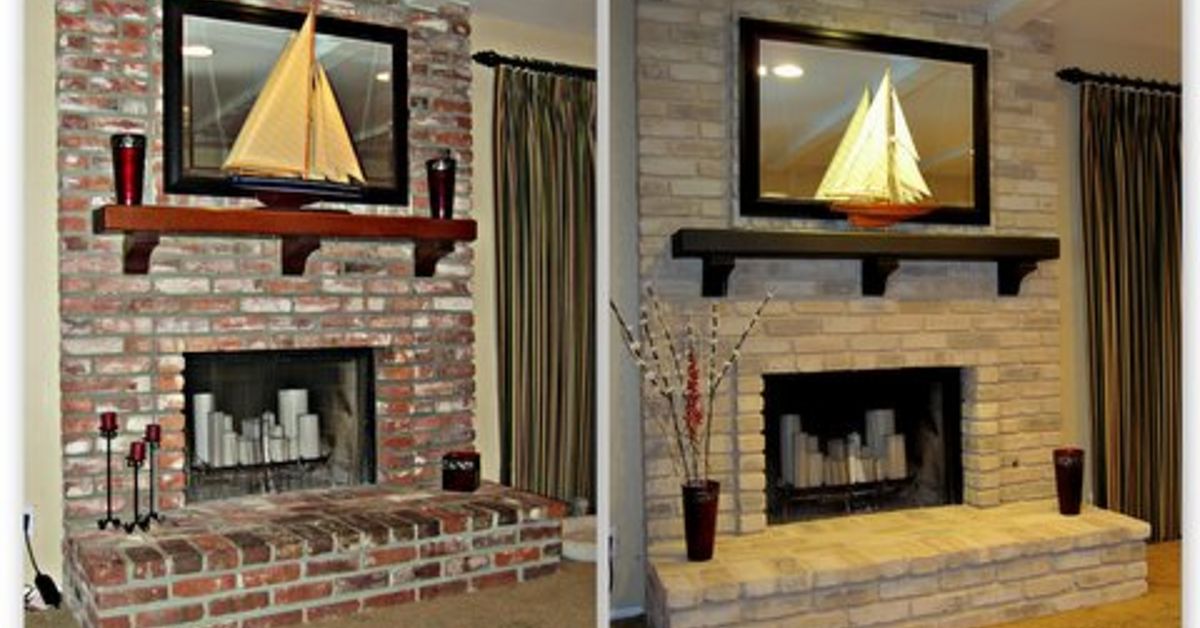
I remember staring at my outdated red brick fireplace, knowing it needed a change but feeling intimidated by the project. After researching and finally taking the plunge, I discovered that painting brick completely revitalizes a space with surprisingly durable results. The process requires careful preparation and the right materials, but the impact makes every step worthwhile. My formerly dark, oppressive fireplace now serves as a bright, modern focal point that makes my whole living room feel larger. While purists may argue against painting brick, the refreshed look transformed my space in ways I never imagined possible. Here’s exactly how I achieved professional-looking results without professional help.
Preparation proved to be the most crucial phase of the entire project. I started by thoroughly cleaning the brick with trisodium phosphate (TSP) to remove decades of soot, dust, and grease. A stiff bristle brush helped scrub the mortar lines, while a toothbrush tackled stubborn spots in the textured surface. After rinsing, I waited a full 48 hours for the brick to dry completely, knowing moisture trapped beneath paint could cause peeling later. Next, I applied painter’s tape around the mantel and hearth, protecting adjacent surfaces from accidental brush strokes. This tedious preparation took nearly a full day, but created the ideal foundation for paint adhesion.
Choosing the right paint required more consideration than I initially expected. After consulting with paint specialists, I selected a high-quality latex masonry paint designed specifically for brick surfaces. The color decision took weeks of deliberation, eventually landing on a warm white with subtle gray undertones. I purchased both a thick-nap roller for the brick faces and angled brushes for mortar lines. A bonding primer formulated for masonry surfaces became essential for proper adhesion, especially on the glossy areas of older brick. Testing samples on inconspicuous spots helped me visualize the final result before committing to the entire fireplace.
Applying the primer changed everything, transforming the brick’s porous surface into an ideal painting canvas. I used a brush to cut in around edges and mortar lines first, then followed with a roller for large flat areas. The primer revealed imperfections I’d missed during cleaning, allowing me to spot-treat problem areas before the topcoat. Two thin coats of primer provided better coverage than one thick application, with drying time between coats as specified on the product. Watching the brick’s natural color disappear under the primer made the transformation feel suddenly real. This step proved vital for achieving uniform color in the final result.
Painting day brought both excitement and nervous energy as I prepared to permanently alter my fireplace’s character. Starting from the top and working downward prevented drips on finished sections. The thick-nap roller deposited paint perfectly into the brick’s textured surface, while my angled brush carefully filled each mortar line. First coat coverage appeared patchy, which initially concerned me until remembering that brick typically requires multiple coats. After allowing proper drying time, the second coat delivered the rich, even finish I’d envisioned. Stepping back to admire the progress, I could already see my living room’s entire aesthetic shifting.
The finishing touches elevated my painted fireplace from good to great. Once fully dry, I lightly sanded any rough areas with fine-grit paper for a smooth touch. A clear matte protective sealant added durability while maintaining the paint’s natural appearance. I removed the painter’s tape at a 45-degree angle to prevent peeling, revealing crisp edges along the mantel. For added dimension, I considered whitewashing the mortar lines but ultimately preferred the uniform look. Finally, styling the mantel with simple decor allowed the fresh paint to shine as the star of the space. These final steps locked in the professional-quality finish I’d worked so hard to achieve.
Living with my painted brick fireplace has surpassed all expectations. The light-reflecting surface makes my entire room appear brighter and more spacious. Cleaning proves surprisingly easy, requiring only occasional dusting or gentle wiping. After two years, the paint shows no signs of chipping or wear, even near the firebox opening. The neutral backdrop allows me to change seasonal decor without clashing colors. Friends who initially questioned painting brick now compliment the updated look and often ask for advice on their own projects. The transformation cost less than replacing the fireplace and took only a weekend of focused work.
Seasonal changes highlight my painted fireplace’s versatility throughout the year. During holidays, the white backdrop makes red and green decorations pop vibrantly. In summer, the clean lines complement breezy, minimalist styling. The neutral tone transitions seamlessly between decor styles as my tastes evolve. I’ve noticed how different lighting throughout the day plays across the textured surface, creating subtle shadows that maintain visual interest. What began as a practical update became a dynamic design element that adapts to every occasion and season.
If considering painting your brick fireplace, I recommend embracing the process fully. While the change feels permanent, the results can always be adjusted with new paint colors later. Proper preparation and quality materials make all the difference in achieving lasting results. My painted fireplace now serves as the heart of my home, radiating light and style rather than the dated heaviness it once projected. The project boosted my confidence in tackling other home improvements, proving that dramatic transformations often lie just beyond initial hesitation. For anyone debating whether to paint their brick fireplace, I say wholeheartedly—go for it.

Will painting my brick fireplace trap moisture and cause damage?
Properly prepared and painted brick won’t trap moisture if you use breathable masonry paint and ensure the surface is completely dry before starting. My research confirmed that quality latex masonry paints allow vapor transmission while protecting the surface. The key lies in thorough cleaning, proper priming, and avoiding thick paint applications. After two winters, my painted fireplace shows no moisture issues or peeling. Just avoid oil-based paints that can create a moisture barrier, and always address any existing water intrusion problems before painting.
How do I clean soot off brick before painting?
TSP (trisodium phosphate) worked wonders for removing decades of soot from my fireplace. I mixed it with warm water according to package directions and scrubbed with a stiff brush. For stubborn areas, a paste of baking soda and water applied with a toothbrush lifted embedded stains. After scrubbing, I rinsed thoroughly with clean water and allowed complete drying. The cleaning process revealed the brick’s original color and created the perfect surface for paint adhesion. Don’t skip this step, as soot prevents proper paint bonding.
Can I paint over previously painted brick?
Yes, but proper preparation differs from unpainted brick. I tested a small area of my fireplace that had old paint by sanding lightly and applying primer. If the existing paint is peeling, you’ll need to scrape and sand thoroughly before repainting. For glossy finishes, a deglosser helps new paint adhere. My neighbor successfully painted over her 1980s white brick by cleaning, lightly sanding, and using a bonding primer. The key is creating a sound, clean surface regardless of previous treatments.
What’s the best paint finish for a brick fireplace?
I chose a matte finish for its natural appearance and ability to hide imperfections. Eggshell offers slightly more sheen while remaining wipeable. Avoid high-gloss finishes that highlight every brick irregularity and create unwanted reflection. My matte finish maintains the brick’s texture while providing easy maintenance. Test samples in your space, as lighting affects how finishes appear. Remember that lighter colors make fireplaces recede visually, while darker tones make them stand out.
How long does painted brick last before needing repainting?
With proper preparation and quality paint, my fireplace still looks fresh after two years with no touch-ups needed. Experts estimate well-done brick paint jobs last 5-10 years before showing wear. High-traffic areas near the firebox may need occasional spot treatment. My white paint hasn’t yellowed near heat sources thanks to heat-resistant primer. Durability depends on paint quality, preparation, and environmental factors like humidity and sunlight exposure.
Can I reverse painted brick if I change my mind later?
While technically possible, removing paint from brick is extremely labor-intensive. Chemical strippers require careful application, and sandblasting can damage the brick. I accepted that my decision was essentially permanent before starting. If unsure, consider whitewashing first for a semi-transparent look that’s easier to modify. Some homeowners test their color choice on a single inconspicuous brick before committing. Once painted, embrace your new fireplace rather than dwelling on reversal possibilities.

Faux brick painting

Painting Brick Fireplace – From White to Beautiful Brownstone – Pretty Handy Girl

How to Whitewash a Brick Fireplace – Life. Family. Joy

Painting A Brick Fireplace Hometalk
How to Paint a Brick Fireplace – Infarrantly Creative

Remodelaholic Dark Gray Painted Fireplace Focal Wall

Related Posts: