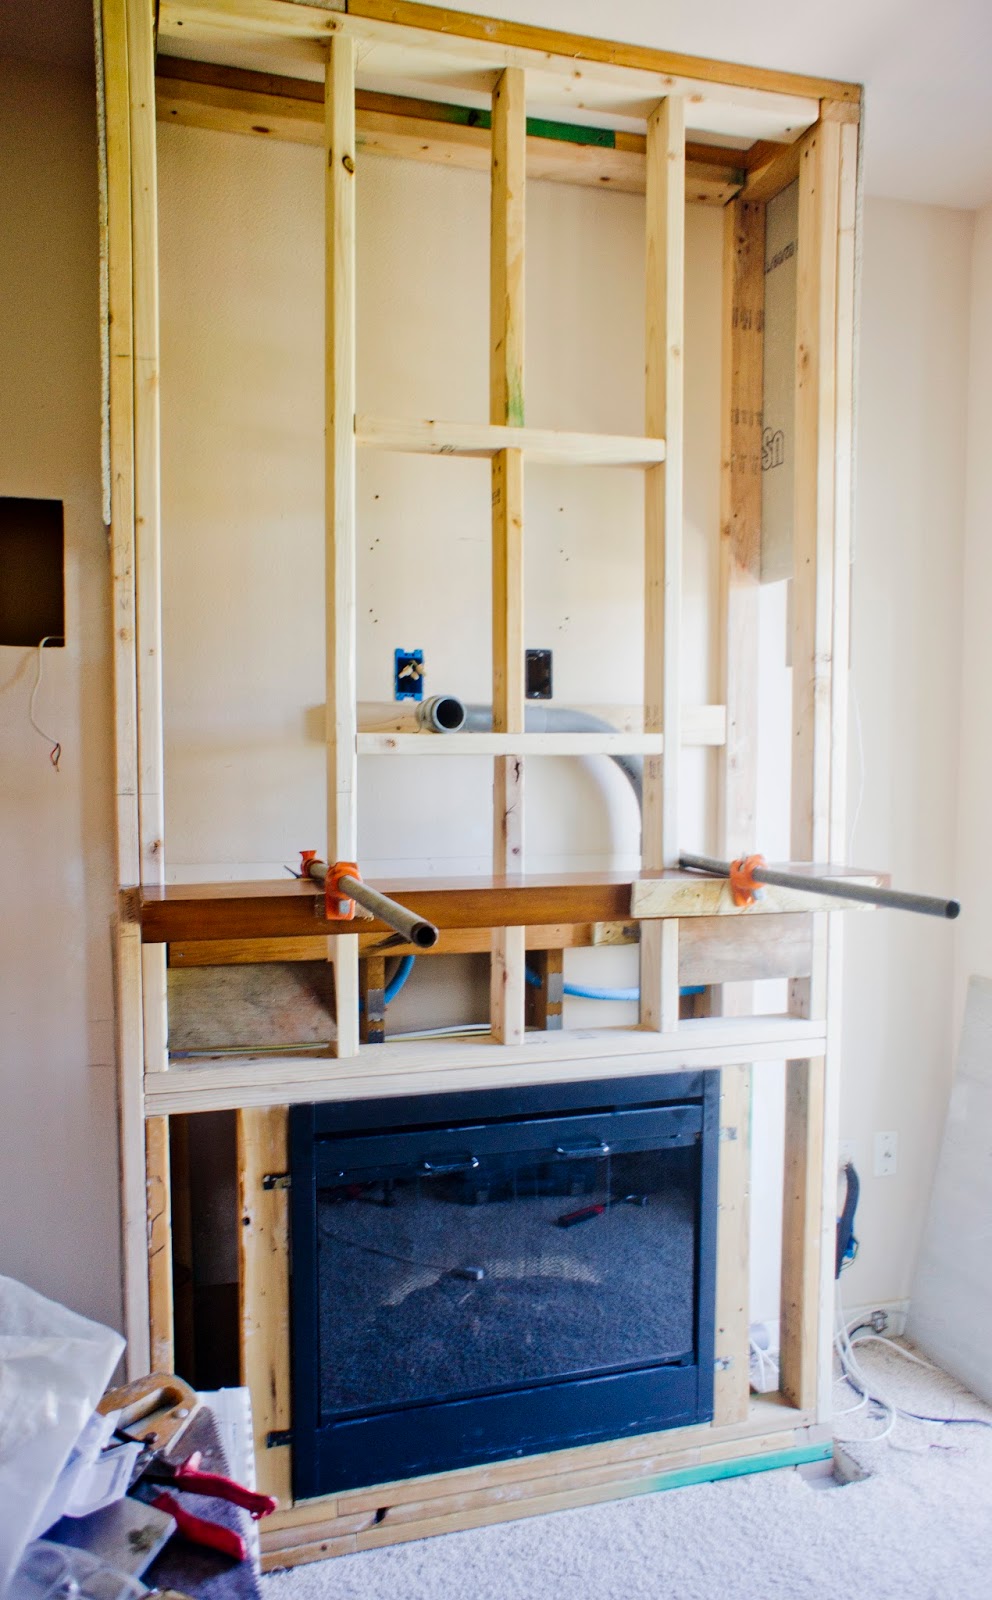
Installing a fireplace insert requires proper framing to ensure safety, efficiency, and a polished finish. The framing process involves creating a sturdy structure that supports the insert while maintaining proper clearances from combustible materials. Before starting, review the manufacturer’s specifications for required dimensions and ventilation needs. Typically, non-combustible materials like metal studs or cement board are used to frame around the insert. Accurate measurements and level installation are crucial to prevent operational issues. Proper framing also allows for seamless integration with existing mantels or surrounds, enhancing the fireplace’s aesthetic appeal.
The first step is measuring the fireplace opening and the insert’s dimensions to determine the necessary framing adjustments. Most inserts require a minimum clearance of 1-2 inches from surrounding walls for proper airflow and heat dissipation. Use a tape measure to verify the height, width, and depth of the existing space, comparing it to the insert’s requirements. If the opening is too large, additional framing will be needed to reduce it. Mark the areas where studs or supports must be installed, ensuring they align with the insert’s mounting points. Double-check all measurements before cutting materials to avoid costly mistakes.

Selecting the right materials is essential for a safe and durable frame. Metal studs are ideal because they are non-combustible and resistant to warping from heat exposure. Cement board or fire-rated drywall can be used to cover the framing, providing additional protection against high temperatures. Avoid wood framing near the insert unless specified as safe by the manufacturer. If wood must be used, maintain proper clearance and cover it with a heat-resistant barrier. Secure all materials with high-temperature screws or masonry anchors, depending on the existing fireplace structure. Proper material selection ensures long-term stability and compliance with fire safety codes.
Constructing the frame begins with installing vertical studs on either side of the fireplace opening. These studs provide the primary support for the insert and any surrounding finishes. Use a level to ensure they are perfectly plumb before securing them to the floor and header. Horizontal cross braces may be needed to reinforce the structure, especially for larger inserts. Leave adequate space between the frame and the insert for ventilation and future maintenance access. If the fireplace has an uneven surface, shims can help level the frame. Take time to verify the stability of each component before proceeding to the next step.

Once the frame is built, install heat-resistant sheathing to enclose the structure. Cement board is a common choice, as it can withstand high temperatures and provides a stable surface for finishing materials. Cut the sheathing to fit snugly around the frame, leaving small gaps for expansion. Secure it with corrosion-resistant screws, ensuring no edges protrude into the insert’s space. If the insert includes a decorative surround, attach mounting brackets to the frame at this stage. Proper sheathing not only protects the surrounding walls but also creates a smooth base for tile, stone, or other finishing touches.
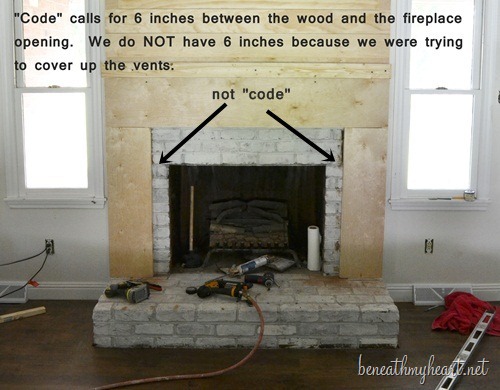
Ventilation and clearance requirements must be strictly followed to prevent overheating and fire hazards. Most inserts need space at the top, sides, and rear for air circulation, which helps dissipate heat efficiently. Check the manufacturer’s guidelines for exact measurements, as these vary by model. Ensure no insulation or flammable materials are within the specified clearance zones. If the insert has a blower or venting system, frame around these components to avoid obstruction. Proper airflow extends the insert’s lifespan and maintains safe operating temperatures. Neglecting clearance requirements can void warranties and create dangerous conditions.
After framing and sheathing, test-fit the insert to confirm proper alignment before final installation. Slide the insert into the framed opening, checking for any obstructions or misalignments. Verify that the unit sits level and that all vents or flues are accessible. Make adjustments to the frame if necessary, ensuring a seamless fit. This step prevents issues when permanently installing the insert, such as gaps or uneven weight distribution. Once satisfied, remove the insert and prepare for finishing work, such as applying tile adhesive or mortar for stone veneers. A precise test fit saves time and avoids complications later.
Finishing the framed area with tile, stone, or other materials enhances the fireplace’s appearance while providing additional protection. Use heat-resistant adhesives and grout to secure tiles or stone veneers to the cement board. Ensure the finish materials do not encroach on the insert’s clearance zones. For a modern look, metal trim or floating shelves can be added around the frame. If painting, choose high-temperature paint designed for fireplace use. The finishing touches should complement the insert’s design while maintaining functionality. Properly executed finishes create a cohesive and professional installation.
Electrical and gas line considerations are critical if the insert requires power or fuel. For electric inserts, run wiring through conduit behind the frame, ensuring connections are secure and up to code. Gas inserts need properly installed gas lines with shutoff valves accessible outside the framed area. Hire a licensed professional for gas or electrical work to ensure safety and compliance. Conceal wires and pipes within the frame while allowing easy access for maintenance. Improper installation of utilities can lead to malfunctions or hazards, so professional assistance is recommended for these steps.
Final installation involves securing the insert into the framed space and connecting necessary utilities. Follow the manufacturer’s instructions for anchoring the unit, whether with brackets, screws, or other hardware. Recheck all clearances and connections before operating the insert. Once installed, test the fireplace to ensure it functions correctly, checking for proper heat output and ventilation. Inspect the surrounding frame for any signs of excessive heat or shifting. A well-framed insert should operate efficiently and blend seamlessly into the room’s design, providing warmth and ambiance for years to come.

What materials should I avoid when framing a fireplace insert?
Avoid using combustible materials like untreated wood or standard drywall near the insert, as they can pose fire hazards. Wood framing may be acceptable only if proper clearances are maintained and covered with fire-rated sheathing. Plastic or vinyl components should never be used, as they can melt or emit toxic fumes when heated. Always prioritize non-combustible materials such as metal studs, cement board, or fire-resistant drywall. Check the insert’s manual for specific material restrictions to ensure compliance with safety standards.
How much clearance is needed around a fireplace insert?
Clearance requirements vary by model, but most inserts need at least 1-2 inches of space on all sides for ventilation. The rear and top often require more space, sometimes up to 6 inches, depending on the unit’s heat output. Always refer to the manufacturer’s specifications for exact measurements. Insufficient clearance can lead to overheating, reduced efficiency, or even fire risks. Proper spacing ensures safe operation and prolongs the insert’s lifespan by allowing heat to dissipate effectively.

Can I frame a fireplace insert myself, or should I hire a professional?
DIY framing is possible if you have experience with construction and follow safety guidelines. However, hiring a professional is recommended for complex installations, especially those involving gas or electrical connections. Improper framing can void warranties or create hazards. A certified installer ensures compliance with local building codes and manufacturer requirements. If unsure, consult a professional to assess your fireplace’s specific needs and avoid costly mistakes.
Do I need a permit to install a fireplace insert?
Many jurisdictions require permits for fireplace insert installations, particularly for gas or wood-burning models. Permits ensure the work meets safety and building code standards. Contact your local building department to verify requirements before starting the project. Skipping permits can result in fines or complications when selling your home. Professionals often handle permit applications as part of their services, simplifying the process for homeowners.

How do I ensure proper ventilation for my insert?
Proper ventilation depends on the insert type. Wood and gas inserts require a functional flue or venting system, while electric models need adequate airflow around the unit. Follow the manufacturer’s guidelines for vent placement and clearances. Ensure no obstructions block vents, and regularly inspect them for debris. Poor ventilation can cause smoke buildup, carbon monoxide risks, or overheating. If unsure, have a professional inspect your chimney or venting system before installation.
What finishing materials are safe to use around a fireplace insert?
Heat-resistant materials like tile, stone, or metal are ideal for finishing the framed area. Use fire-rated adhesives and grout to secure these materials. Avoid flammable finishes such as untreated wood or wallpaper near the insert. High-temperature paint can be used on surrounding walls if desired. Ensure finishes do not encroach on the insert’s clearance zones. Choosing the right materials enhances safety while creating an attractive fireplace surround.

Related Posts: