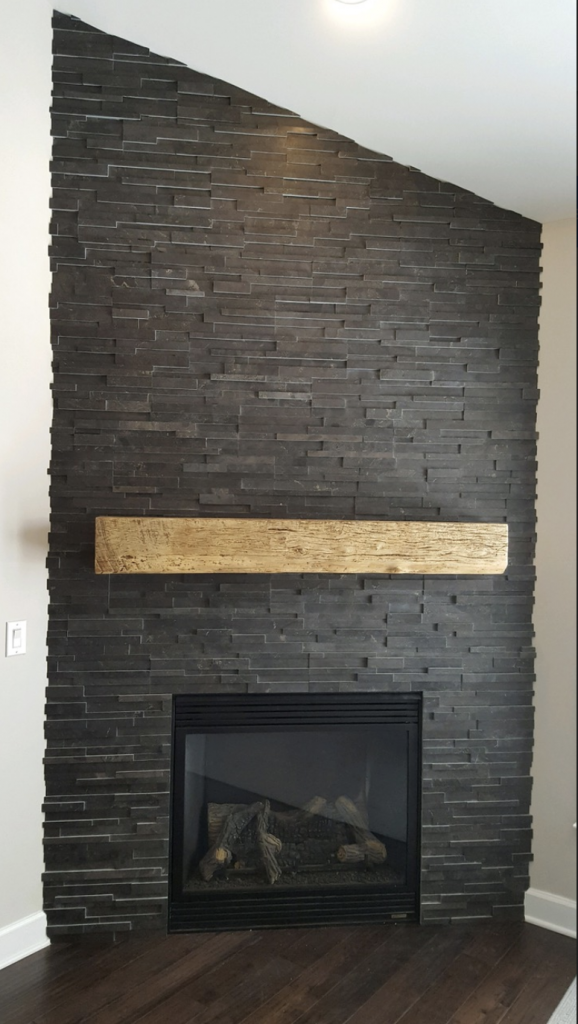
Last autumn, I stared at my brick fireplace with its nonexistent mantel, feeling frustrated by the missed opportunity for holiday decorations and family photos. The builder had installed a basic gas insert surrounded by plain brick, leaving a stark, utilitarian appearance that dominated my living room in all the wrong ways. Professional mantel quotes ranged from $800 to $2,000, motivating me to explore DIY alternatives that could achieve the same visual impact for a fraction of the cost. That decision launched my most rewarding woodworking project, transforming both my fireplace and my confidence in tackling complex home improvements.
My research into mantel styles revealed countless design possibilities, from simple floating shelves to elaborate traditional surrounds with columns and detailed moldings. I studied fireplace proportions and learned that mantel width should extend 6-12 inches beyond the firebox opening on each side, while height depends on ceiling proportions and personal preference. Pinterest and home improvement magazines inspired, but I ultimately chose a rustic beam style that would complement my farmhouse décor while remaining within my intermediate skill level and available tool collection.

Wood selection became my first major decision as I weighed appearance, cost, and workability factors. Reclaimed barn wood offered authentic character but commanded premium prices and required extensive preparation to remove nails and weathered surfaces. I ultimately chose rough-sawn white oak from a local sawmill, appreciating its natural grain patterns and durability at half the cost of reclaimed alternatives. The 8×8 beam would provide substantial visual weight while hiding the mounting hardware necessary for secure installation above my fireplace opening.
Design planning required careful measurements and consideration of local building codes regarding combustible materials near fireplace openings. I learned that most jurisdictions require 6-inch clearances between wood mantels and firebox openings, though gas inserts often allow closer installation than wood-burning fireplaces. My mantel design incorporated a 2-inch reveal above the brick opening, creating shadow lines that would enhance the visual separation between old and new elements. Detailed sketches helped me visualize proportions and identify potential installation challenges before cutting expensive lumber.
Tool requirements exceeded my existing collection, necessitating both purchases and borrowing from generous neighbors. The circular saw and drill I owned would handle basic cutting and assembly, but I needed a router for creating decorative edges and a reciprocating saw for notching around uneven brick surfaces. A quality level became essential for ensuring proper alignment during installation, while various clamps would hold pieces securely during glue-up and finishing processes. Safety equipment including dust masks and eye protection proved essential during sanding and routing operations.
Preparation work involved extensive sanding to achieve the smooth surface I desired while preserving the wood’s natural character. Starting with 80-grit sandpaper removed mill marks and rough spots, progressing through 120 and 220 grits for final smoothness. I discovered that oak’s open grain structure benefits from grain filler application before staining, preventing blotchy appearance and ensuring even color absorption. This additional step added a day to my timeline but dramatically improved the final finish quality compared to skipping this professional technique.

Staining and finishing required multiple test applications on scrap pieces to achieve the perfect color match with my existing trim and furniture. The natural oak looked beautiful but appeared too light against my darker brick surround. I selected a medium walnut stain that enhanced the grain patterns while providing the rich color I desired. Three thin coats of semi-gloss polyurethane provided durable protection against heat and humidity while maintaining a natural wood appearance that wouldn’t compete with seasonal decorations.
Installation presented the most challenging aspect of the entire project, requiring precise measurements and secure mounting into wall studs behind the brick veneer. I used a stud finder to locate framing members, then drilled pilot holes through mortar joints to avoid damaging the brick faces. Heavy-duty lag bolts provided the necessary holding power for the substantial oak beam, while hidden mounting cleats allowed the mantel to appear as though it emerged naturally from the wall. The installation required two people due to the beam’s weight and awkward positioning above the fireplace.

Fine-tuning involved multiple adjustments to achieve perfect level and alignment with the fireplace opening below. Even minor inconsistencies became glaringly obvious once the mantel was in place, requiring patient shimming and repositioning until everything appeared precisely positioned. I used color-matched wood putty to fill screw holes and minor gaps, sanding smooth once dry. The final installation looked so professional that visitors consistently ask for my contractor’s contact information, never suspecting the work was completed by an amateur.
My completed DIY wood fireplace mantel cost approximately $200 in materials compared to thousands for professional alternatives, while providing immense satisfaction and valuable woodworking experience. The rustic oak beam now serves as the focal point for holiday decorations, family photos, and seasonal displays that bring warmth and personality to our living space. Friends and family consistently compliment the beautiful craftsmanship, boosting my confidence to tackle even more ambitious projects throughout our home. The mantel has become a conversation piece that showcases both natural wood beauty and personal accomplishment.

What safety clearances are required between wood mantels and fireplace openings?
Building codes typically require minimum 6-inch clearances between combustible materials like wood mantels and fireplace openings, though specific requirements vary by jurisdiction and fireplace type. Gas inserts often allow closer installation than wood-burning fireplaces due to lower heat output, but always check local codes before installation. I positioned my mantel 8 inches above the firebox opening to exceed minimum requirements while creating better visual proportions. Contact your local building department for specific clearance requirements in your area, as violations could affect insurance coverage or resale value.
How do I securely mount a heavy wood mantel to a brick fireplace wall?
Secure mounting requires locating wall studs behind the brick veneer and using appropriate fasteners rated for the mantel’s weight. I used a powerful stud finder to locate framing members, then drilled through mortar joints rather than brick faces to avoid cracking. Heavy-duty lag bolts provide superior holding power compared to standard screws, while hidden mounting cleats create clean installations without visible hardware. For solid masonry walls without wood framing, masonry anchors or through-bolts may be necessary. Always consult structural engineers for mantels exceeding 50 pounds or unusual installation conditions.
What wood species work best for DIY fireplace mantel construction?
Hardwoods like oak, maple, and cherry provide durability and beautiful grain patterns that improve with age, though they cost more and require sharper tools for cutting and shaping. Softwoods like pine and fir offer easier workability and lower costs but may dent or scratch more readily over time. I chose white oak for its strength, attractive grain, and reasonable cost compared to exotic alternatives. Consider your skill level, available tools, and budget when selecting lumber, remembering that stain and finish choices can dramatically alter any wood species’ final appearance.
How long should I expect a DIY wood mantel project to take from start to finish?
My project required approximately 20 hours spread across three weekends, including planning, cutting, sanding, finishing, and installation phases. Wood preparation and finishing consumed the majority of time, with multiple sanding stages and finish coats requiring drying time between applications. More complex designs with decorative moldings or carved details could extend the timeline significantly, while simpler floating shelf styles might be completed in a single weekend. Plan for potential delays due to weather affecting finishing work or the need to acquire additional tools or materials during construction.

Can I install a DIY wood mantel without extensive woodworking experience?
Basic DIY skills and patience can produce excellent results with careful planning and appropriate tool selection. Start with simpler designs like floating beam mantels before attempting complex surrounds with multiple components and decorative elements. I had moderate woodworking experience but learned new techniques through online tutorials and advice from knowledgeable lumber yard staff. Take time to practice cuts and techniques on scrap lumber before working on final pieces, and don’t hesitate to ask for help with challenging aspects like installation or finishing work.
What tools are essential for building a wood fireplace mantel?
Essential tools include a circular saw or miter saw for cutting lumber to length, a drill for pilot holes and assembly, sandpaper or random orbital sander for surface preparation, and a quality level for installation alignment. A router adds professional-looking decorative edges, while clamps hold pieces during glue-up and finishing. Safety equipment including dust masks, eye protection, and hearing protection are crucial for health and comfort. Many specialized tools can be borrowed or rented rather than purchased, making the project accessible even with limited tool collections.
Related Posts: